Wednesday, January 30, 2013

Full of Love Today


As I was in the shower today, I felt an overwhelming feeling of love.  I don't know why and I'm not questioning it.  Maybe it's because I talked to my parents briefly today.  Maybe it's because my crush smiled at me today.  Maybe it's just because.  Whatever the reason, have some. 

Photos and captions are mine.  Feel free to pin and share.  If you feel the love, spread it.  Safely, of course ;)


Pin It

Wednesday, January 23, 2013

Some Fancy Pictures From This Weekend.

I went to a 16th birthday for my friend's daughter this weekend.  The party was held during the day at Busby's East in Los Angeles and I never noticed much of the decor (mostly because the few times I've been, it was dark and crowded with drunkassery).  But wow!  I was in hog heaven with so many photo ops.  These are just a few of my favorites from the party.  I couldn't decide for two which looked better either in color or black and white so I'm sharing both versions.


Friday, January 18, 2013

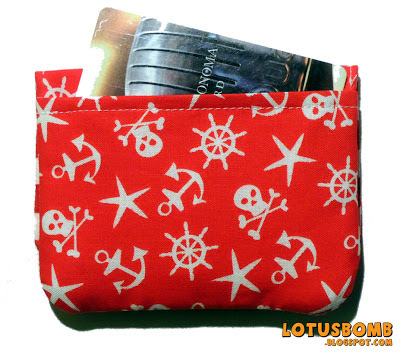
Aaarrrrhhhh! Pirate Wallet

I have a habit of buying fabric and never getting around to using it and this piratey print I got at Joann's is no exception.  A while back, I was really into making these little card wallets (excuse the quality of the pictures--they were from before I learned how to take quality photos) and would pre-cut out all the pieces.   But then I would get distracted with another more fun project, and those cut pieces just sat in a drawer, forgotten.  So, as I was looking through my fabric stash for another project, I came across the pirate print and in true me form, I got distracted from the first project and decided to finally put together the wallet :)  The only thing I did differently is that I used fabric for the back pocket opposed to the vinyl I was using before.  I like the fabric pocket much better.


The back pocket.

Vinyl back pocket

Pin It

Wednesday, January 16, 2013

Smoooches! Lips Shaped Wristlet


I love making shaped pouches.  That's why I'm partly so obsessed with working with felt (it has more stability and I can be more creative with it).  But this is not a felt awesomeness project.  This is just plain sewing awesomeness.  I made this saucy red lips wristlet for a 16 year old after I looked through Pinterest for inspiration.  Originally, I wanted to make her a make up bag to house the Victoria Secret's lotion and body spray I bought as part of her birthday gift.  But I couldn't find the "right one' to make.  Don't get me wrong....I pinned a lot of the make up bags I saw for me.  This kid has her own style, so not just any type of bag will do.  That is until I saw this pin and I knew....*this* was the one (if only finding m soulmate would be just as easy :)

I drew out a template, used red vinyl and a red zipper I already had and went to town.  Less than an hour later, the lips were done.  I didn't add a lining to it because I couldn't really figure it out it didn't really need it (the vinyl is sturdy enough and the inside looks fine the way it is). 

The wristlet can be used to hold makeup or as a clutch purse.  Definitely roomy enough to hold at least a cell phone, lipstick, keys and the cash and card stash. 

When I'm not feeling so lazy tired, I'm going to put together a tutorial.

Pin It

Sunday, January 13, 2013

I Heart Boba iPhone 4 Case


Just wanted to share a custom request for this pink I Heart Boba phone cozy for an iPhone 4.  I love making anything that has to do with boba! 


Pin It

Thursday, January 10, 2013

T-Shirt Refashion: From Boxy Tee to Fitted Dolman Style


I've been wanting to refashion some boxy t-shirts for a while but never found a style that I really liked.  That is until I saw this tutorial on how to make a dolman sleeve style shirt from scratch.  Granted, I never thought much about dolman sleeves, in fact, I didn't think about them because they never really appealed to me.  But for whatever reason, the Make It & Love It tutorial gave me inspiration so I looked around on the internet to see if I could find a tutorial to make one from an existing shirt.  Enter Trash to Couture (I love her!).  When I saw her tutorial the gears in my  head started turning.  Using the Trash to Couture tutorial as a base, I cut and sewed my sleeves as she instructed.  But instead of ruching the sides, I added a banded bottom (inspired by the Make it & Love It tute) instead. I also cut the collar off a little wider to give it more of a boatneck and left it unhemmed cause I like that look.

The 15 year old BP shirt that I can now wear again..
The banded bottom.


Pin It

Monday, January 7, 2013

Fancy Bow Clutch


I made this fancy bow clutch from this pretty awesome tutorial I found on Pinterest.  I already had this satiny blue fabric on hand and I'm pretty happy with how this turned out.  These were so easy to make that I made a few other variations.

Vinyl Black And White Bow Clutch


Pin It

Sunday, January 6, 2013

Button Closure Phone Case

Made this turquoise and orange case last week for a friend for her new phone.  There's an extra pocket to stash some cash for those quick runs to the store when you don't want to bring your purse. I also added in a button and elastic closure to keep it closed. 


Pin It

Saturday, January 5, 2013

Thai Style Chicken Soup


I love Thai food and especially the soup but sometimes, it's so expensive for such a small serving of the Tom Kha or Tom Yum soups so I decided to try my hand at making my own.  

I decided to try this Thai Chicken Soup recipe I found on Allrecipes.com.  The first time I made it, it was a little bit bland tasting because I'd forgotten the shallots, didn't use canned coconut milk (for cooking) and didn't use enough red curry paste.  The second time came out absolutely delicious and the only minor thing I would change is add a little more of the red curry paste for more heat but it came out very tasty. I forget that coconut milk can cancel out some of the heat.  I changed up the recipe a little because I like my soup a bit more chunky so this is more of a Thai style soup instead of an authentic recipe.  Not sure this Chinese girl can make an authentic recipe .  Ha!


3 shallots, sliced
cilantro
crimini mushrooms
thinly sliced chicken (however much you want but I used 5 pieces of the cut chicken breasts)
cooked shrimp without tail (however much you want)
1 can sliced water chestnuts
1 can sliced bamboo shoots
1 can cut baby corn
2 cans coconut milk
2 cans chicken broth
1 tbs grape seed oil
3 tsp fish oil (found at the Asian market)
2 heaping tbs (or to your taste) of red curry paste (found mine at Wholefoods)
juice of 2 limes
jasmine rice (optional)


Heat the grape seed oil in the pot you are using for the soup.  Cook the shallots and a handful of the cilantro until the shallots are translucent.  Add in the chicken broth and the coconut milk.  When its starts to simmer, add in the crimini mushrooms, water chestnuts, baby corn and bamboo shoots.  In a small bowl, combine the fish oil, lime juice and red curry paste.  Once the paste is not lumpy, stir the mixture into the soup.  Add the chicken in and stir every few minutes to make sure the chicken doesn't stick together and cooks properly.  Once the chicken looks cooked, add in the shrimp.  Simmer for a few more minutes and serve over jasmine rice. 

Just some notes:
The fish oil smells fishy but it doesn't make the soup taste or smell fishy unless you add in the entire bottle.   

I meant to get lemongrass paste too (I can't seem to find fresh lemongrass) to give it a little more Thai flavor but I kept forgetting to get it. 


Pin It

Friday, January 4, 2013

Color Block Tank


This is a color block tank I made that actually started out as a skirt.  Well, it was actually a very matronly skirt (it didn't come out the way I expected) that I made for the Craft Challenge that I decided I didn't like how it fit.  The more I cut to try to "fix" it, the smaller and smaller it became until it fit like a mini skirt.  I can't do minis (I'm not 20 anymore) unless I rock them with fishnets and boots so this mini instead became a tank.  A color block tank specifically because I needed something other than another black tank and something that would look nicer than a wife beater tank.  Ok.  So, it's not much of a color block but it has some color now.  I'm in love with banded bottoms so naturally, I had to add one to this tank.

I used two different knits for the tank because I really don't like the original knit I got.  It's too clingy and works better as a shirt opposed to a tank.  The banded bottom and the teal is a heavier knit but not clingy.

Here's the closeup of the top part.


I think this would look adorable under a 3/4 sleeve cardigan with the color peeping out from the open top of the sweater.  It would also work by itself and looks nicer than a regular tank if you needed a nicer looking top. Which I do.  Did.  Mission accomplished.


Pin It

Thursday, January 3, 2013

Lemon Pepper Chicken Stir Fry ( Gluten Free)


I am starting to really like this cooking thing.  I made this very lemony pepper chicken stir fry dish based on this orange chicken recipe I found on Pinterest.  I didn't have oranges on hand but had lemon so I changed it up a little and used Tamari Soy Sauce instead of regular SS to make it gluten free.

I ended up with a little over 2 servings based on what I used below.  You may end up with more or less depending on how much chicken and veggies you add.  The veggies I use were what I had on hand.  You can use whatever you have or prefer.  I would have made it more Asian if I had water chestnuts and cut baby corn :) 

Ingredients:
5 pieces of cut chicken breast, sliced
fresh broccoli florets
green and red pepper (I used frozen as that is what I had on hand)
2 large carrots, peeled and sliced
1 tbs of olive oil

For the sauce:
zest of  lemons
juice of  lemons
1 tsp of ground or fresh ginger
2 tbs of rice vinegar
2 tbs of Tamari Soy Sauce (or regular SS if you're not a gluten free diet)
1 tbs of oyster sauce
3 cloves of garlic, minced

1 tbs of sugar

 In a small bowl, combine all the ingredients for the sauce.  Pour a little of the sauce in another bowl and add some of the cut chicken to it.  Stir the chicken around to marinate them in the sauce.  Keep adding more chicken and a little more sauce each time until all the chicken is marinated.  Keep in mind, you need most of the sauce for the stir fry so you don't need to let the chicken swim in a pool of sauce :)

Heat the oil in a frying pan.  Add in all the veggies except for the broccoli, stirring frequently for about 2 minutes.  Add in a little bit of the sauce and stir the veggies around to marinate them.  Put the cover on for about 2 minutes to let them "steam" cook.  Add in the chicken and the rest of the sauce.  Stir the chicken around so they are not sticking to one another.  Once the chicken turns mostly white, put the top back on for another minute or so.  Stir the broccoli in and put the top back for another minute.  Check to make sure the chicken is completely done and when it is....Voila!  Your lemon pepper chicken stir fry is ready to be enjoyed!  Serve over jasmine rice and ground up some black pepper over the yumminess!

My Notes:
I don't like my broccoli mushy which is why I add them in at the end and only cook for a short time.  Because the chicken is cut thinly, be sure you don't over cook unless you like your chicken dry.  Blech. 

Update 1/08/13 - I just made this dish again because I was too lazy to go out and do more grocery shopping so I use what I had on hand.  The second time around, I only used 1lemon for the juice and zest (opposed to the 2 I originally used for the recipe) and agave sweetener instead of sugar.  I like how it came out the second time.  The lemony flavor is not as strong and the agave sweetener made it just perfect to balance out the tamari sauce.  


Pin It

Wednesday, January 2, 2013

Cherry Pie for the Elf!

A while back, my friend's mom bought a Christmas elf on clearance for dirt cheap but the pie it was supposed to have was missing so she asked me to make her one and here is the result. A perfect fit if I do say so myself!

photo provided by the elf's owner :)
closeup of the pie


Pin It

Ugly Pillows Makeover


I redid the pillows on my couch tonight.  It's been on my never-ending list of things to do and I finally got them done tonight. It only took me about 30 minutes to cover up 5 pillows.  I wonder why I procrastinated so long on a project that took barely any time.  Hmm....something to ponder about.

There's one (okay two) that doesn't quite go with the animal print theme going on but I made that western one a few years ago and am really proud of it and haven't decided if I should cover it up or not.  And the hula girl stays.  She matches the rest of the decor that you can't see in the pic :)

Pin It

Tuesday, January 1, 2013

Gluten and Dairy Free Chocolate Ganache Cake


What can I say.  I love chocolate and I love cake.  I found this awesome recipe that I tweaked just a little to suit my tastes.

For the cake:
2 cups of gluten free all purpose flour (I use Bob's Red Mill)
3/4 cup unsweetened cocoa
2 tsp baking soda
1 tsp baking powder
1/2 tsp salt
1 cup sugar (I don't like my cake overly sweet but if you do, add in 2 cups)
2 eggs
1/2 cup oil
1 cup non-dairy milk (I used rice)
2 tsp pure vanilla extract (I make my own)
1 cup of hot, strong coffee (to bring out the chocolate)

For the ganache (original recipe here):
3/4 cup non-dairy milk of choice (I used rice)
1/4 cup soy margarine (I used Earth Balance)
1 bag of  62% dark cacao chocolate chunks (or whatever you want to use)


Preheat oven to 350 degrees F (175 degrees C). Grease the 2 loaf pans with non-stick, non-flour spray. 

In a large bowl, stir together the flour, sugar, cocoa, baking powder, and baking soda. Add in the oil, milk, eggs, and vanilla and mix until smooth. Stir in the hot coffee last. Split the batter into the two loaf pans.   You want the cake to be done about an inch or so below the pan so you only want the batter to fill it about halfway. 


Bake in the preheated oven for 25 to 35 minutes, or until a toothpick inserted into the cake comes out clean.


Ganache:
In a small saucepan, heat the milk and margarine until the margarine melts.  Add in half the chocolate and stir until melted.  Add in the rest of the chocolate and stir until melted.  Make sure you stir often so the chocolate doesn't burn. Once melted, turn off burner. 

By this time, you should have about an inch or so of space from the top of the pan to the cake.  If you don't, you can cut some of the top off.  Pour the ganache evenly on top of both cakes.  Refrigerate for at least two hours and serve chilled.

My notes and observations:
The first time I made this, I made some cupcakes and poured the rest of the batter into a loaf pan.  I also bake with my toaster oven.  Yeah.  Don't laugh.  I really do.  My regular oven doesn't work and I have more control with my grown-up "easy bake oven".  I put too much batter into my loaf pan so while the top was baked to perfection, the middle and bottom was not.  The longer it stayed in my GUEBO (Grown Up Easy Bake Oven), the beautiful perfection that was the top layer started to burn.  So, I ended up cutting a good bit of the top off so that the rest of the cake would bake. 

I had "frosted" the cupcakes with ganache and tried it warm and it didn't excite me.  Between the cake and the ganache not being too sweet, it did leave me wishing I added some sugar to the ganache.   But I didn't.

I was already running late for work so I just poured in the rest of the ganache on top of the cake (mostly to hide the uneveness of it) and stuck it in the fridge.  And by golly, this must be what it's like to make things by accident! Not only did the cake turn out delicious served chilled but once cut, I loved how the ganache filled in the dips of the cake.
 

Pin It